Hi folks.
This is it. The final gallery of my Opel Blitz, type 2,5-32 from ICM.
As I've mentioned in the first part, I changed my way of modelling, in terms of weathering. I tried to focus on one small area and make whole weathering steps on that area, then move to another. I am happy with the results, as I've got a nice model with different kinds of different weathering steps density. That helps the model to look more random. One more thing - in each model I try some new thing. This time it was WOOD structures.
Well, I'll leave it for you to judge.
poniedziałek, 23 października 2017
czwartek, 31 sierpnia 2017
Opel Blitz 2,5-32, 1/35, ICM 35402. PART 5
Hi.
Summer's over. It was invigorating, so I can get back to project. Here's some pictures.
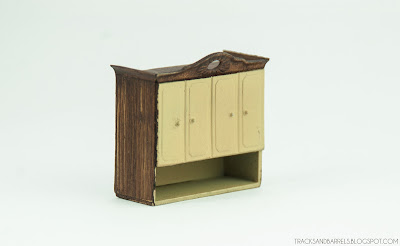
Finally moved to painting loading of a truck - the furniture.
First, it was a coat of Old Wood acrylic paint.
Then I dilluded some brown artistic oil paint.
I've put a nice, thick coat of it with a brush.
And then, with really sharp brush I did those wood grain. It was really easy.
With furniture being done I moved to another important bit: base.
First, a coat of gray. I used two or three shades. Then I did the wash. Afrika Korps Wash from AK. I didn't shake the bottle to well and I used lots of pigments from the bottom of it.
After few minutes I sprinkled some dry pigments. Grey tones, browns. After two minutes I wiped everything with paper towel. I love the effect. Really do. Some of the stones are polished, some are soaked in wash, others are covered with pigments, which sits great in space between the stones. Really realistic finish.
Then I decided to break the finish of the back of the truck with some colour accents...
...and I have finished with the furniture.
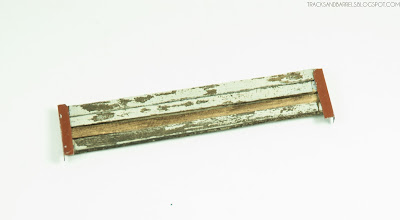
Time to move to the sides of the back of the truck.
I painted one of the side White which was peeled of with tape.
Also put some more pigments in the middle...
Other side panel remained "woody".
That is it for now. Looks like I'm closer to final looks... :)
Thanks for watching.
Dawid
Summer's over. It was invigorating, so I can get back to project. Here's some pictures.
Finally moved to painting loading of a truck - the furniture.
First, it was a coat of Old Wood acrylic paint.
Then I dilluded some brown artistic oil paint.
I've put a nice, thick coat of it with a brush.
And then, with really sharp brush I did those wood grain. It was really easy.
With furniture being done I moved to another important bit: base.
First, a coat of gray. I used two or three shades. Then I did the wash. Afrika Korps Wash from AK. I didn't shake the bottle to well and I used lots of pigments from the bottom of it.
After few minutes I sprinkled some dry pigments. Grey tones, browns. After two minutes I wiped everything with paper towel. I love the effect. Really do. Some of the stones are polished, some are soaked in wash, others are covered with pigments, which sits great in space between the stones. Really realistic finish.
Then I decided to break the finish of the back of the truck with some colour accents...
Time to move to the sides of the back of the truck.
I painted one of the side White which was peeled of with tape.
Also put some more pigments in the middle...
Other side panel remained "woody".
That is it for now. Looks like I'm closer to final looks... :)
Thanks for watching.
Dawid
niedziela, 25 czerwca 2017
Opel Blitz 2,5-32, 1/35, ICM 35402. PART 4
Hi. Paints have been used...
First, a layer of red primer paint. That was followed by rather handsome portion of hairspray.
Afther that, I put Panzer Gray which was chipped. A lot.
I want to have lots of layers.
Next layer was a Dark Yellow. Of, course, I put hairspray before that.
Next: some more chipping. Looks good for me.
The final layer: White.
I want to make impression, that truck was painted white after the war.
Due to lots of use it nearly wore off.
That is it for now...
Thanks for watching...
D.
czwartek, 22 czerwca 2017
Opel Blitz 2,5-32, 1/35, ICM 35402. PART 3
Hi.
More stuff today, finally we'll see what it will look like. Here's the pictures.
I decided to weather the parts surrounding the engine.
Why I did that? Someone might ask. The answer is simple.
Training purposes. If I screw up something, I'd rather have it here, where it will not be visible than on some other, more 'open' project. So - it's just training.
Never ignore an oportunity to train.
I also continued work on interior with some pigments and drybrushing.
I like the effect and the tarp things. I'll try some more of that in future.
And that's the engine. Painted and weathered.
Fitting test. Looks rather nice.
So far everything goes as planned. Let's move to the back.
As I've mentioned in the 'introduction', wood will be main poin of focus. That's balsa wood cut to replicate the floor on a back of the truck.
And that's the back of the truck itself with some putty filling the gaps.
I also put the primer on.
Once the interior is ready, Ive closed the cabin and masked off the windows with KamoiTape.
I like the shape of it. Very distinctive :)
Also glued the floor to the back of the truck.
Finally, the load. That's some furniture.
They come from MiniArt's Furniture Set
Still need some side fencing.
I'm gonna put the truck on this cobblestone street.
Finally, have the final shape.
And the primer's on.
I really like that.
Hope that you do too.
That is it for now. Thanks for watching.
D.
Subskrybuj:
Komentarze (Atom)


